Have you heard about SITS? SITS is a blogging community for women that shares information and tips about blogging, and encourages community through visiting other people's blogs and leaving comments. I joined SITS a couple of months ago and have really enjoyed the people I've met, who have visited me, who I have visited, and of course those wonderful folks who have found me through SITS and become followers of mine. You can learn more about SITS by clicking on their button on the right side of your screen.
Every Saturday Mom, Reinvented writes a short post for SITS about blogging. Yesterday's article was really interesting. Here's a excerpt that stuck out for me...
Have you found your blogging tribe? It’s more than a community. It’s that core group of special blogging peeps that visit and comment regularly and take action on what they read and learn at your blog. They support you, they recommend you, they re-tweet you.
Click HERE to read the full article.
It got me thinking about my "blogging tribe," especially on the heels of my Blogiversary. In the past year I've come from 0 to almost 80 followers, and have connected with bloggers from all over the world. Some people come and go, but some are always stopping by, sharing in my enthusiasm, and leaving positivity.
In light of this, I wanted to give a special shout out to those that I consider to be "my tribe" - those folks that have helped my become a better blogger, have been inspirational to me, and who make my days a little better with their comments and encouragement (Meg, Marie, Gabrielle, Angie, Abby, Jane, Lolly, Katie, Lindsey... the list goes on). I'm currently in the process of adding a "links" tab in my sidebar so that you can check these (and more!) folks out (thanks, Marie for adding me to your blogroll this weekend!)
So what do you think? It may sound kind of silly to say you have a "tribe" but I surely do! What about you, fellow blogger? Do you have a "tribe" of your own? Or are you still searching for like-minded peeps here in cyberspace? How has having a "tribe" helped you grow as a blogger?
Happy Sunday everyone, I hope that you're having a beautiful weekend! Stop back by tomorrow for the February VALENTINES edition of Cupkins, and if you haven't already... be sure to head HERE to enter my giveaway! Entries accepted until 12 midnight est Monday.

Sunday, January 31, 2010
Saturday, January 30, 2010
Week In Review
Each weekend in my Week in Review post I share with you some of my favorite crafty links I've come across during the week, from all over the blogosphere. Enjoy!


These knitted bears are adorable! I love that they are big and huggable!

Everything about these cupcakes is fun! And delicious looking, too! Yum!

I love Lolly and her talents, and hearing her live and in person in her video tutorial was such a treat!

Super talented knitter Marie shared this FREE Ravelry download with us!

Such a great gift idea! I can't wait to try this myself!

Have a wonderful weekend, dear friends! And don't forget to enter my contest by heading over to this post. Contest ends Monday at midnight!
Friday, January 29, 2010
Happy Blogiversary!
Today is it! My official one year Blogiversary! What a wild ride it's been! I have had so much fun creating and sharing projects with you, discovering many other wonderful projects and blogs all over the web, and "meeting" and "getting to know" some wonderful fellow bloggers friends along the way. Every single comment, link, guest post, and feature has been so very much appreciated... thank you.
I have been wanting to clean up my blog's appearance for awhile now... and thought that today was an appropriate day to unveil my new look.... whaddya think? I'm hoping that this new, clean and sleek Ready, Set, Craft will be easy to use, read, and share. Please, let me know your thoughts... and feel free to grab one of my new buttons to post on your blog!
I must tell you that I was hoping to also unveil my finished craft studio to you today. I was reeeeaaaallly hoping to... I mean, wouldn't that have been just a wonderful conclusion to the week?! Unfortunately, I've been sick in bed most of the week, so I haven't been able to finish everything up. I guess that just means there's one more reveal to look forward to, right? Stay tuned for the finished craft studio... I am very excited about how it is coming along!
And now to the important stuff... the giveaways! Thanks so much to everyone who stopped by and entered Tuesday's giveaway for 250 Custom Stickers from UPrinting! Drumroll please... the lucky winner (per the random number generator at Random.org) is...
Congratulations to you! Please drop me an e-mail at joanneroehm@yahoo.com so I can get you all set up to order your FREE 250 stickers! How exciting!
And now, for a final hurrah, let's finish the week with a bang with another giveaway! I'm very excited to announce...
You know that I love stamping, and have so much fun as a demonstrator for Stampin' Up!, that I thought it was only appropriate that we end with a giveaway featuring lots and lots of Stampin' Up! goodies! Here's the list of loot that one lucky winner will enjoy!


1. Leave me a comment telling me about either a current craft project you're working on, or a favorite project you've worked on in the past year or so, and why... for one entry.
2. If you are a follower, or become a follower, let me know in your comment for an additional entry!
3. Sorry, giveaway limited to US Residents only
4. Giveaway is open until midnight EST on Monday February 1, 2010.
I hope you've had fun celebrating my One Year Blogiversary Bash with me this week, and look forward to continuing to explore the worlds of baking, stamping, blogging, and more in the year ahead! Stop back by tomorrow for my "Week in Review" post, where I share fun crafty finds from all over the web, and join me next week for a whole lot of Valentines-y fun! Have a great weekend!
I have been wanting to clean up my blog's appearance for awhile now... and thought that today was an appropriate day to unveil my new look.... whaddya think? I'm hoping that this new, clean and sleek Ready, Set, Craft will be easy to use, read, and share. Please, let me know your thoughts... and feel free to grab one of my new buttons to post on your blog!
I must tell you that I was hoping to also unveil my finished craft studio to you today. I was reeeeaaaallly hoping to... I mean, wouldn't that have been just a wonderful conclusion to the week?! Unfortunately, I've been sick in bed most of the week, so I haven't been able to finish everything up. I guess that just means there's one more reveal to look forward to, right? Stay tuned for the finished craft studio... I am very excited about how it is coming along!
And now to the important stuff... the giveaways! Thanks so much to everyone who stopped by and entered Tuesday's giveaway for 250 Custom Stickers from UPrinting! Drumroll please... the lucky winner (per the random number generator at Random.org) is...
LINDSEY WOLFE!
Congratulations to you! Please drop me an e-mail at joanneroehm@yahoo.com so I can get you all set up to order your FREE 250 stickers! How exciting!
And now, for a final hurrah, let's finish the week with a bang with another giveaway! I'm very excited to announce...
Ready, Set, Craft's One Year Blogiversary Bash STAMPIN' UP! Giveaway!
You know that I love stamping, and have so much fun as a demonstrator for Stampin' Up!, that I thought it was only appropriate that we end with a giveaway featuring lots and lots of Stampin' Up! goodies! Here's the list of loot that one lucky winner will enjoy!
Sweet Birthday Stamp

Butterfly Accent Stamp

Two ink pads... you choose the colors!


Stampin' Write Marker in Basic Black

36 sheet pack of multi-color cardstock (you choose color set)

Here's how you can win!
2. If you are a follower, or become a follower, let me know in your comment for an additional entry!
3. Sorry, giveaway limited to US Residents only
4. Giveaway is open until midnight EST on Monday February 1, 2010.
I hope you've had fun celebrating my One Year Blogiversary Bash with me this week, and look forward to continuing to explore the worlds of baking, stamping, blogging, and more in the year ahead! Stop back by tomorrow for my "Week in Review" post, where I share fun crafty finds from all over the web, and join me next week for a whole lot of Valentines-y fun! Have a great weekend!
Thursday, January 28, 2010
Birthday Cards!
Nothing says "Happy Birthday" like a handmade birthday card from a loved one. I took a little time to play with the "Happy Moments" stamp set from Stampin' Up!'s Sale-A-Bration catalog and came up with a few simply stated birthday cards...

Starting with the 2010 Occasions Mini Catalog, Stampin' Up! now offers repositionable, clear-mount rubber stamps--in addition to our award-winning wood-mount rubber stamps! This is one of the first stamp sets I've ordered in the new clear-mount rubber stamp option, and I have to say -- I liked them a lot!

Clear-Mount Rubber Stamp Features

To order one of our new clear-mount stamp sets (such as "Happy Moments" featured here), to learn more about products used in today's cards, or for any of your Stampin' Up! needs, head over to my Stampin' Up! Website or e-mail me at joanneroehm@yahoo.com!
There's still time to enter the Custom Sticker Giveaway! Head HERE to enter... giveaway closes at midnight EST Thursday 1/28 (today!)
Miss one of this week's birthday-themed posts? Click on to the Birthday Bash button to catch up!
And whatever you do, don't forget to check back here tomorrow for the final day of Ready, Set, Craft's One Year Blogiversary Bash! I'll be announcing Tuesday's giveaway winner, showing off a BIG reveal, and ending the week with a bang with a HUGE giveaway! Don't miss it!

Starting with the 2010 Occasions Mini Catalog, Stampin' Up! now offers repositionable, clear-mount rubber stamps--in addition to our award-winning wood-mount rubber stamps! This is one of the first stamp sets I've ordered in the new clear-mount rubber stamp option, and I have to say -- I liked them a lot!

Clear-Mount Rubber Stamp Features
- Nine different sizes of clear blocks available individually or as a discounted bundle.
- Blocks have ergonomic grooves on all four sides for easy grip and traditional wood-mount feel.
- Stamps and blocks are durable and easy to clean with your Stampin' Scrub and Stampin' Mist.
- Optional image labels on stamp backs let you decide if you want to see the image through the block or not.
- Tight die-cutting for easy image positioning.
- Large clear blocks can be used to create collages or spell words with alphabet sets.
- Stamps store easily in standard, DVD-type cases with artwork on front and spine, making organization easy.

To order one of our new clear-mount stamp sets (such as "Happy Moments" featured here), to learn more about products used in today's cards, or for any of your Stampin' Up! needs, head over to my Stampin' Up! Website or e-mail me at joanneroehm@yahoo.com!
There's still time to enter the Custom Sticker Giveaway! Head HERE to enter... giveaway closes at midnight EST Thursday 1/28 (today!)
Miss one of this week's birthday-themed posts? Click on to the Birthday Bash button to catch up!
And whatever you do, don't forget to check back here tomorrow for the final day of Ready, Set, Craft's One Year Blogiversary Bash! I'll be announcing Tuesday's giveaway winner, showing off a BIG reveal, and ending the week with a bang with a HUGE giveaway! Don't miss it!
Wednesday, January 27, 2010
Ready, Set, Craft's One Year Blogiversary Bash - Sticker Giveaway!

Did I mention yet that I love birthday parties? : )
When I was a kid, my favorite part of my birthday party was the goody bags that I "helped" my Mum put together for all my little friends to take home. It was so fun picking out the kind of bag I wanted and discovering all of the great treats Mum had put inside (yes, even though I was the birthday girl, I got a goody bag as well!)
I still love goody bags and favors, and try to have some kind of takeaway for every party I host. Remember the cupcake goody bags from Lily's first birthday party? Or the favors from Alison's bridal shower? Or how about the last minute Halloween goody bags for my nieces and nephew?
What I always LOVED getting in my birthday party bag was some fun stickers! I swear, no matter how old I get I will always love me some stickers! Stickers are fun for adults, too! They are a great way to promote your blog or your business. You can use them as address labels, event stickers, to seal envelopes or put your child's name inside his/her books and belongings, the list could go on!
Ready, Set, Craft's pals over at UPrinting have given me a great prize to giveaway to one lucky reader!
250 Custom Stickers/Labels!
(2” x 3.5”, 2” x 4”, or 3” x 3”, 70lb Label Matte, Full color front, blank back; 4 Business Day printing,
plus FREE UPS Ground Shipping)
Get creative and design your own stickers featuring your photos, artwork, business logo and more! All FREE from Ready, Set, Craft! and UPrinting, which is a great place for custom stickers, label printing, and more!
Here's how to WIN!
1. Leave me a comment telling me either what you would do with 250 custom stickers/labels OR, your favorite birthday party memory... good for one entry!
2. If you are a follower, or become a follower, let me know in your comment for an additional entry!
3. Sorry, giveaway limited to US Residents only
4. Giveaway is open until midnight EST on Thursday January 28th, 2010.
Come back Friday where I'll announce the winner (picked by a random number generator) and if you didn't win - you'll have the chance to enter yet ANOTHER giveaway -- the final hurrah of Ready, Set, Craft's One Year Blogaversary Bash! Don't miss the fun!

Tuesday, January 26, 2010
THE BRITISH INVASION: Just a (Birthday!) Trifle
Welcome to Day Two of Ready, Set, Craft's One Year Blogiversary Bash! Miss yesterday's post? Click on the Birthday button to your left.
New to THE BRITISH INVASION? Click the Union Jack Flag on the left side of your screen to get caught up!
No matter your age, it's not a birthday without a cake and candles. Hubby's birthday was the perfect excuse to kick off THE BRITISH INVASION by taking the birthday cake a step beyond to norm... and making a birthday TRIFLE!

Trifle is one of my all time favorite desserts. According to Wikipedia... (note jelly is to England as jell-o is to the US. Don't get confused!)
A trifle is a dessert dish made from thick (or often solidified) custard, fruit, sponge cake, fruit juice or, more recently, gelatin, and whipped cream. These ingredients are usually arranged in layers with fruit and sponge on the bottom, and custard and cream on top.
The earliest known use of the name trifle was for a thick cream flavoured with sugar, ginger and rosewater, the recipe for which was published in 1596 in a book called "The good huswife's Jewell". It wasn't until sixty years later when milk was added and the custard was poured over alcohol soaked bread
Some trifles contain a small amount of alcohol such as port, or, most commonly, sweet sherry or madeira wine. Non-alcoholic versions may use sweet juices instead, as the liquid is necessary to moisten the cake layers.
One popular trifle variant has the sponge soaked in jelly (liquid-gelatin dessert) when the trifle is made, which sets when refrigerated. The egg and jelly bind together and produce a pleasant texture if made in the correct proportions.
A trifle is often used for decoration as well as taste, incorporating the bright, layered colours of the fruit, jelly, egg custard, and the contrast of the cream.
My Mum has always made trifle for birthday's, special occasions or parties, and we most recently enjoyed it this past Christmas. My BFF in England and fellow trifle-lover, Claire, and I chatted about trifle at the beginning of this year, noting the differences between our families' recipes, and those of other Brits.
Talking to Claire is what gave me the inspiration for THE BRITISH INVASION, and she was kind enough to share her very own trifle recipe, and even provided some of the text and photos I'll be sharing today. So without further ado, here we go!
You will need:
A deep dish – glass ones are good because then you can see all the layers!
Pound cake or sponge cake
Jam (optional)
Fruit – can use anything but we think raspberries or strawberries are best!
Sherry or fruit juice
Jelly – preferably the same flavor as the fruit!
Birds Custard Powder
Milk and sugar (for custard)
Whipping Cream
Sliced, blanched almonds (optional)
Instructions:
Take your sponge or pound cake and line the bottom of your dish. If you like, spread a little jam on each piece. Here's Claire's... WITH jam...

And mine... without!

If you're old school like my Mum and me, you'll add about two tablespoons of sherry at this point, and let it soak into the cake. Sherry is a fortified wine, you can find it near the port in the liquor aisle. If you're like Claire and don't care for sherry, you can use any sweet fruit juice instead! (Claire prefers orange or apple)

Then you can add your fruit – that’s layer two! Claire used strawberries and raspberries, I used plain strawberries.


Make up your jelly (remember, jelly in England is jell-o here!)

Add your custard – this is layer four! I used Bird's Custard Powder which is imported from England - I found it in the world foods section of my local grocery store!


Spread the cream on top of your trifle. That’s Layer five!
Now decorate if you wish! Claire uses hundreds and thousands (aka sprinkles!) or you could put some fresh raspberries/strawberries on the top! Layer six completes the trifle!!!


Claire's finished trifle!
My Mum usually garnishes our trifles with more almonds, but since it was Hubby's birthday I took a leaf out of Claire's book...


My first trifle was a SUCCESS! What fun! I must admit I picked the easiest British recipe to start off with, so stay tuned for more BRITISH INVASION posts to see my attempts at cooking traditional British recipes!
And be sure to come back tomorrow for more birthday fun including a GIVEAWAY! See you then, friends!
Monday, January 25, 2010
Ready, Set, Craft's One Year Blogiversary Bash!

Happy Birthday to me, Happy birthday to me
Happy Birthday to...
my husband?!?!
It's going to be a very special and busy week here at Ready, Set, Craft! Not only am I celebrating my first complete year of blogging all this week, but today I'm also celebrating hubby's 28th birthday!
LET'S PARTY!
I love any excuse to throw a party really... so this week we're going to celebrate all birthday's - yours, mine, hubby's, my blog... it's going to be all birthday's all the time... so hang on to your hats! (Your party hats, of course!)
Each day this week there will be at least one birthday-themed post... with a lot of surprises thrown in along the way! I'll also be sharing favorite posts, project or tutorial from Ready, Set, Craft's first year of existence, so be sure to check that out as well!
And to top off the week you're going to want to be sure to tune in on Friday for some super secret stealthy reveals (confused? more hints to come!) and my
Blogiversary Bash Giveaway! Trust me, you don't want to miss it!
So without further ado, let me share a little birthday project with you to kick off our party...
Ready Set Craft's Recycled Birthday Banner
I very firmly believe that birthday's should be celebrated wholeheartedly no matter how old you get. Just because we're not kids any more doesn't mean we don't want cake, balloons, or games! For my husband's birthday today (Happy Birthday, Travis!) I wanted his day to start out with a smile, so I whipped up a little banner out of newspaper and wrapping paper.

Supplies:
Newspaper, Wrapping Paper, Ribbon, Adhesive, Hole Punch, Scissors / Paper Trimmer
How to:
This was super easy! I cut a stack of newspaper into 7x9inch rectangles, then trimmed them into triangles.


I then cut letters out of the scraps of wrapping paper I had leftover from wrapping Trav's birthday presents. What was SUPER helpful was the gridlines on the paper, made for easy letter sizing and drawing! I then cut them out, which was the time consuming part.

I used spray adhesive to attach the letters to the newspaper, then outlined them in black sharpie to make them stand out. I punched two holes in each triangle to feed ribbon through.
I love any excuse to throw a party really... so this week we're going to celebrate all birthday's - yours, mine, hubby's, my blog... it's going to be all birthday's all the time... so hang on to your hats! (Your party hats, of course!)
Each day this week there will be at least one birthday-themed post... with a lot of surprises thrown in along the way! I'll also be sharing favorite posts, project or tutorial from Ready, Set, Craft's first year of existence, so be sure to check that out as well!
And to top off the week you're going to want to be sure to tune in on Friday for some super secret stealthy reveals (confused? more hints to come!) and my
Blogiversary Bash Giveaway! Trust me, you don't want to miss it!
So without further ado, let me share a little birthday project with you to kick off our party...
Ready Set Craft's Recycled Birthday Banner
I very firmly believe that birthday's should be celebrated wholeheartedly no matter how old you get. Just because we're not kids any more doesn't mean we don't want cake, balloons, or games! For my husband's birthday today (Happy Birthday, Travis!) I wanted his day to start out with a smile, so I whipped up a little banner out of newspaper and wrapping paper.

Supplies:
Newspaper, Wrapping Paper, Ribbon, Adhesive, Hole Punch, Scissors / Paper Trimmer
How to:
This was super easy! I cut a stack of newspaper into 7x9inch rectangles, then trimmed them into triangles.


I had some yellow raffia in my stash, and I fed all of the pennants onto some long pieces of it.


Sunday, January 24, 2010
Sunday's Wash

After becoming a mom, my dear friend Cindy came up with an eco-friendly way to launder her cloth diapers. It is non-toxic and biodegradable. This product is formulated to clean your cloth diapers with out leaving residue behind. Many commercial cleaners will reduce the absorbancy of your diapers causing leaks. This laundry wash rinses clean and has never caused a breakout or rash on even the most sensitive newborn skin!
Cindy also recommends her laundry wash for use on all your newborn's clothes and linens. It's cheaper than the leading baby detergent! Special enzymes help break down spit-up, baby food, and all sorts of baby messes. Be sure to pre-treat with a stain remover for best results.
Only 1/8 cup is needed per diaper load. Only 18 cents per load!
So if you have little ones, or know someone who does (the packaging is so cute, it would make a great baby shower gift!), head over to Cindy's Etsy Shop and place your order today. And don't forget to tell her Joanne sent ya!
Saturday, January 23, 2010
Week In Review
Each weekend in my Week in Review post I share with you some of my favorite crafty links I've come across during the week, from all over the blogosphere. Enjoy!


Have a beautiful weekend, everyone! Stop by tomorrow for a great find for your little ones, and be sure to visit me next week... it's my one year blogaversary!
(via UCreate)
This is absolutely darling! And pop over and see the pics of her little one modeling it. Adorable!

(via UCreate)
I love the colors in this frame! Would be a sweet Valentines gift for a friend.

What a cute pattern! I'm looking forward to trying this soon - I have all kinds of friends with babies!

These have been all over the blogosphere this week... and rightly so! Maya is always such a wonderful source of inspiration for me, with simplistic principles and beautiful creations.

I just love these ladies' style. I am always getting great project ideas from them for my Stampin' Up! workshops and classes.

Have a beautiful weekend, everyone! Stop by tomorrow for a great find for your little ones, and be sure to visit me next week... it's my one year blogaversary!
Friday, January 22, 2010
Craft Studio Update 3
Joining us for the first time? I'm making-over my craft studio space! Head here to get caught up!
Welcome to the madness that is the making-over of my crafty-space. Phew! (I apologize in advance for the poor quality photos today -- it was getting late as I was working through the mess and natural light was long gone!)
What a project this is turning out to be! Today I called in the reinforcements and had one of my closest friends Heather and her pre-teen daughter Mariah come over to help. Heather went through an organized all things yarn and fabric while Mariah was patient enough to sort through, re-spool and pin ALL of my ribbon. What troopers! I appreciated it so much!
I found a home for all of the jars of markers today. You remember that my yucky vinyl-sided walls can't handle much weight, so shelving isn't much of an option. I put them up on the window ledge where they will be easy to see and access.


I moved some shelving into the closet. And boy, is that closet jam packed! I like it though - because I am really, really, REALLY trying to keep the actual room as free of "stuff" as possible. As long as I can see and access everything in the closet, I'm fine with it being full!
That being said, the large tubs on the left may end up coming out of the closet eventually and just stack in a corner of the room if they are too hard to pull out when I need them. We'll see...

After the closet was complete, I went ahead and cleared out the rest of the room...


The small sewing table will go next to the ironing board with my machine and basic notions. The table will fold down so that when I teach classes and workshops, I can put away the sewing stuff (in the overflowing closet?!) and add the table to the end of my long work table to create seating space for 10.
The darkness and angle of these photos make the room look teeny tiny, and it's not large by any means, but there's enough room to walk all the way around the table and that's what I'm looking for.

Argh! The craft studio contents have spilled into the rest of the basement! But no fear, I'm staying strong, and I will conquer the rest of this junk! Have faith!
Stay tuned for another craft studio update next Friday... could I possibly finish it by then? Wish me luck!!!
Welcome to the madness that is the making-over of my crafty-space. Phew! (I apologize in advance for the poor quality photos today -- it was getting late as I was working through the mess and natural light was long gone!)
What a project this is turning out to be! Today I called in the reinforcements and had one of my closest friends Heather and her pre-teen daughter Mariah come over to help. Heather went through an organized all things yarn and fabric while Mariah was patient enough to sort through, re-spool and pin ALL of my ribbon. What troopers! I appreciated it so much!
I found a home for all of the jars of markers today. You remember that my yucky vinyl-sided walls can't handle much weight, so shelving isn't much of an option. I put them up on the window ledge where they will be easy to see and access.


I moved some shelving into the closet. And boy, is that closet jam packed! I like it though - because I am really, really, REALLY trying to keep the actual room as free of "stuff" as possible. As long as I can see and access everything in the closet, I'm fine with it being full!
That being said, the large tubs on the left may end up coming out of the closet eventually and just stack in a corner of the room if they are too hard to pull out when I need them. We'll see...

After the closet was complete, I went ahead and cleared out the rest of the room...


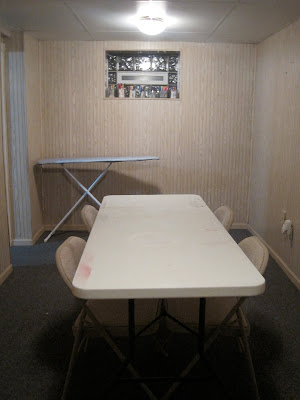
Painting is obviously the next big thing on the agenda, but I'm a really visual person and needed to get a feel for how I was going to set up the space, so I brought in some of the major "furniture" elements to see how they will work... (you can see I still need to take some major chemicals to that table to get it clean... I'll get to it I swear!)

The small sewing table will go next to the ironing board with my machine and basic notions. The table will fold down so that when I teach classes and workshops, I can put away the sewing stuff (in the overflowing closet?!) and add the table to the end of my long work table to create seating space for 10.
The darkness and angle of these photos make the room look teeny tiny, and it's not large by any means, but there's enough room to walk all the way around the table and that's what I'm looking for.

Not bad, eh? I feel like I've made some significant progress. This weekend is going to be a busy one for us... but I'm really hoping I can find time to paint the room. Only question is... what color? I'm thinking yellow, a coral-ish color, or a light pink. What do you think? Leave me color suggestions in the comments!
Oh, and while everything in craft studio is looking wonderful... I can barely bring myself to show you...
(wait for it)
THIS!!!

Argh! The craft studio contents have spilled into the rest of the basement! But no fear, I'm staying strong, and I will conquer the rest of this junk! Have faith!
Stay tuned for another craft studio update next Friday... could I possibly finish it by then? Wish me luck!!!
Subscribe to:
Posts (Atom)