Wednesday, March 31, 2010

Guest Post: Recycled Notebooks

I constantly find myself in awe of the wonderfully talented people I encounter daily - especially here in the land of blogging.  

I share links to some of the fabulous projects I come across each weekend in my Week in Review posts, and now on (most) Wednesday's... at least for a awhile... I'm going to be going a step further and inviting one of those creative folks to guest blog here at Ready, Set, Craft! 

For today's post, I'm thrilled to welcome the adorable Sarah from Auburn Street!


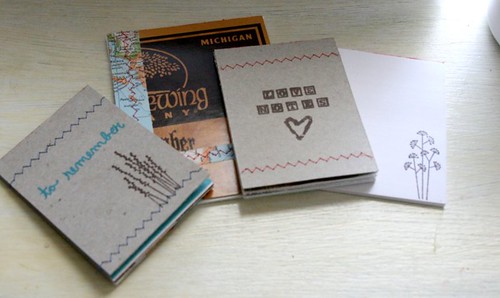
This is my absolute favorite little project right now. I am always writing down projects I want to try out, books that look good, movies to see, and grocery lists on scraps of paper and shoving them in my purse. These little notebooks are perfect for sliding into your back pocket or sticking on the fridge to remind yourself of those oh-so-important things! Crafty, functional, and recycled!

 First thing's first, gather your supplies:
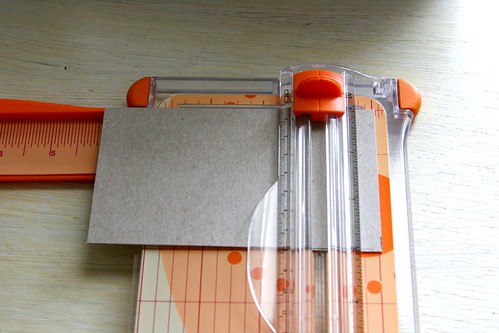
The essentials for this project are padding compound and a paper cutter. I bought my padding compound here, in the quart size. The bottle will be enough for thousands of notepads, and I haven't ben able to find a smaller amount anywhere. Padding compound is a magical pink (or white) substance that you paint onto stacks of paper to turn them into notepads. Pretty much amazing!! I also can't imagine doing this without a paper cutter, since all of your pages need to be the same size so that they'll stick together.
- A thin paintbrush
-Small binder clips or clothespins
-a variety of paper to slice up - I use a mix of cool pages from catalogues, scraps of maps from an old Atlas, lined index cards, and construction paper. You could use anything you have lying around!
-Thin cardboard - A cereal box is the perfect thickness for the back and front of your book. I've used beer boxes and old shirt boxes as well.
Ready to start??

Step 1: Choose the size you want  your notepad to be. For this tutorial, I'll be making a 3 inch by 4 inch pad. So you'll cut two pieces of cardboard for your front and back covers.
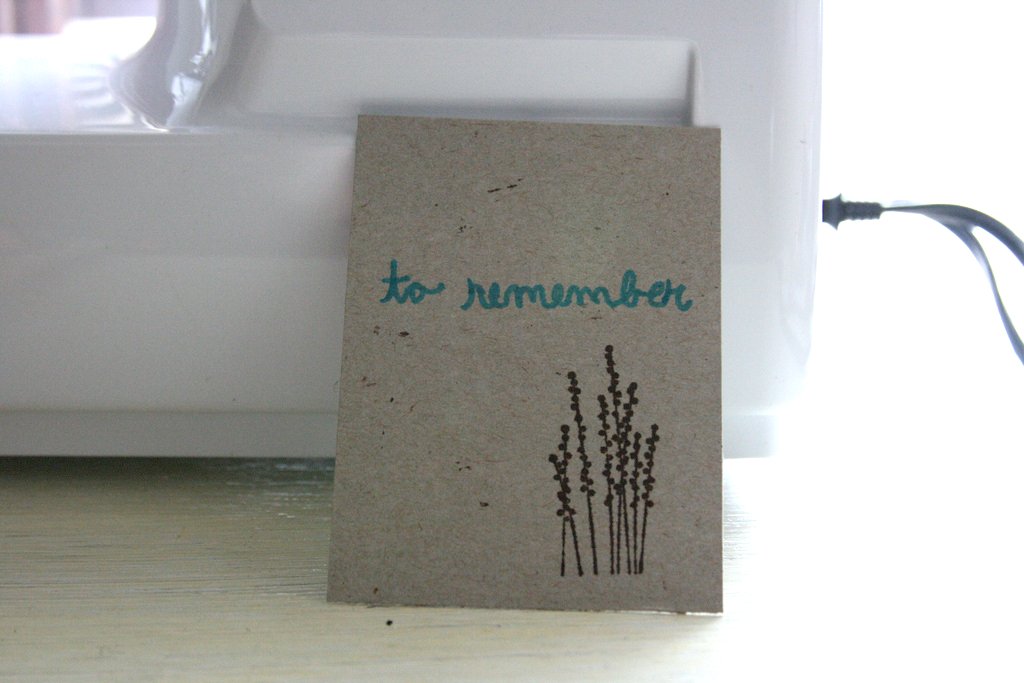
Step 2: Decorate the cover. I like using rubber stamps or permanent markers to write what the notebook will be for. 
Step 3: Add a little detail with your sewing machine (or just hand stitch a little design on!). I set my machine to zig-zag stitch, and put the cover a under the foot. Make sure you pull the thread through enough so that there is a few inches of extra thread off the end. Don't backstitch - just sew straight across, and cut the thread so that there are a couple inches of extra thread on this side, too.

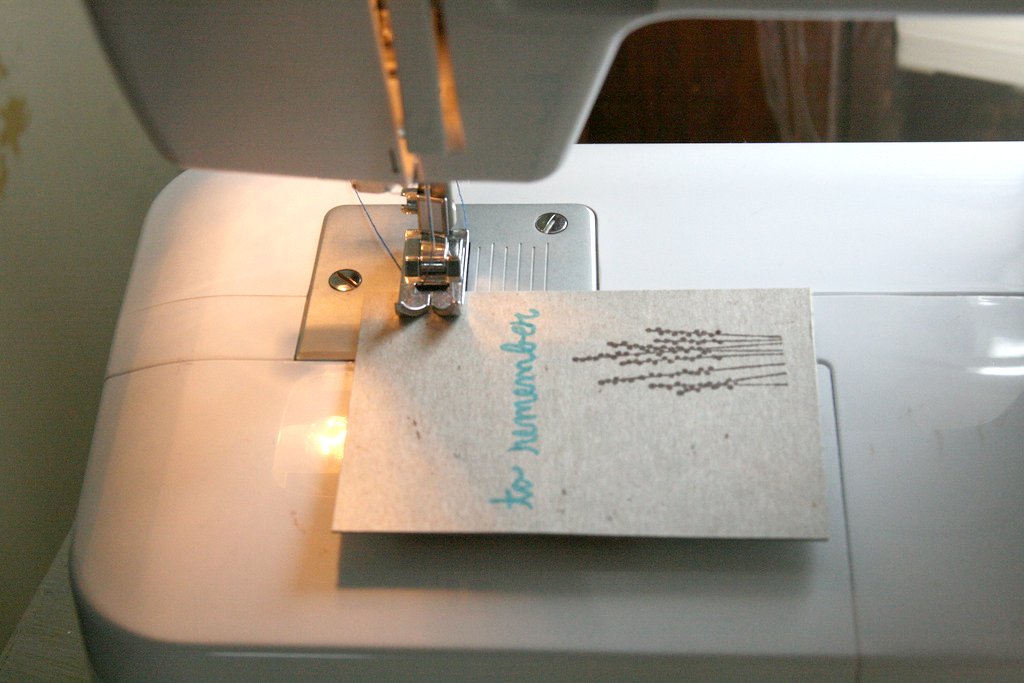
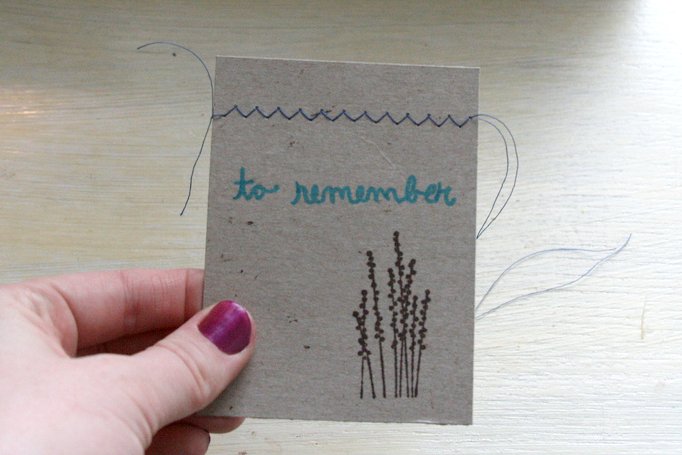
Now, you'll want to tie off the extra thread so that the stitches don't unravel. Do this by tying a small knot on the back side of the cardboard.        
Woohoo! One zig-zag done! Now do another one if you'd like, because you are a pro.
Step 4: Time to cut the pages! Make sure you measure, measure, measure, the closer your pages are to being exactly the same size, the better. This is my favorite part. I seriously use whatever I have on hand - and then I arrange the pages so they are in completely random order:
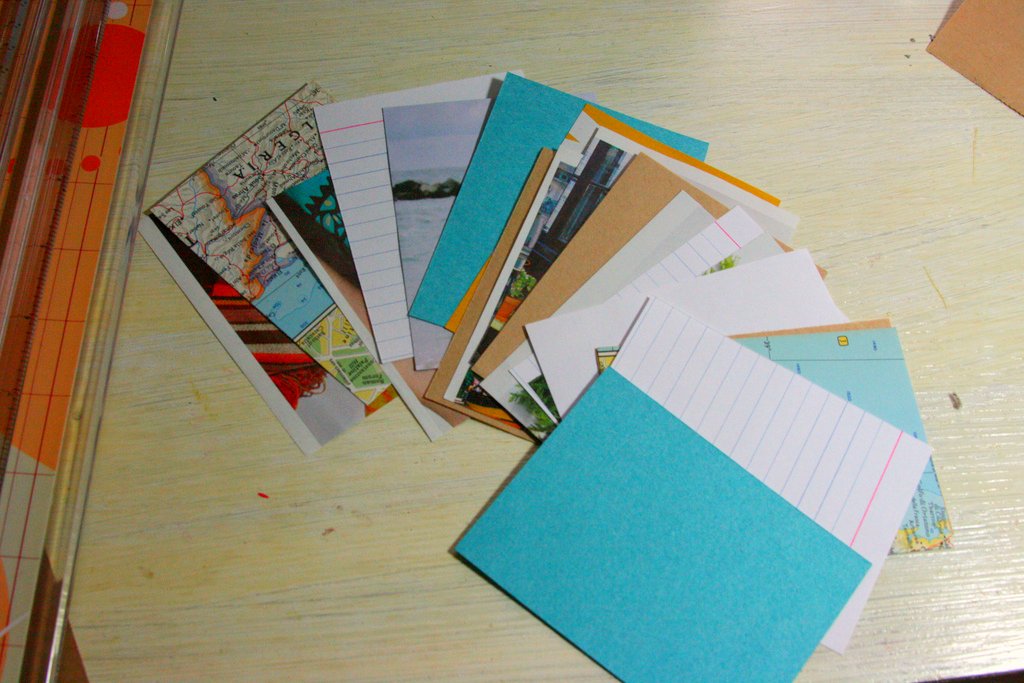
Look how bright and colorful! You could use graph paper, old kids books, the inside of security envelopes, junk mail, coloring book pages, anything! I just make sure the pages are light enough to write on...
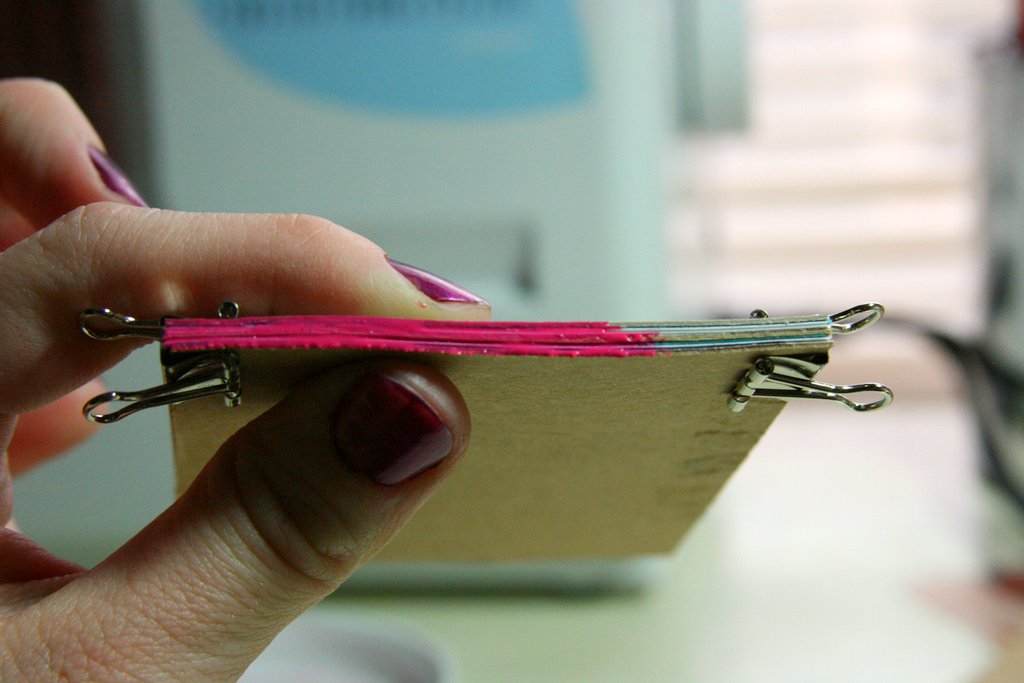
Step 5: Once you have all of your pages cut, line up the pages between the front and back covers.
Then, use binder clips or clothespins to press all of the pages together and paint a light layer of padding compound onto the top edge.

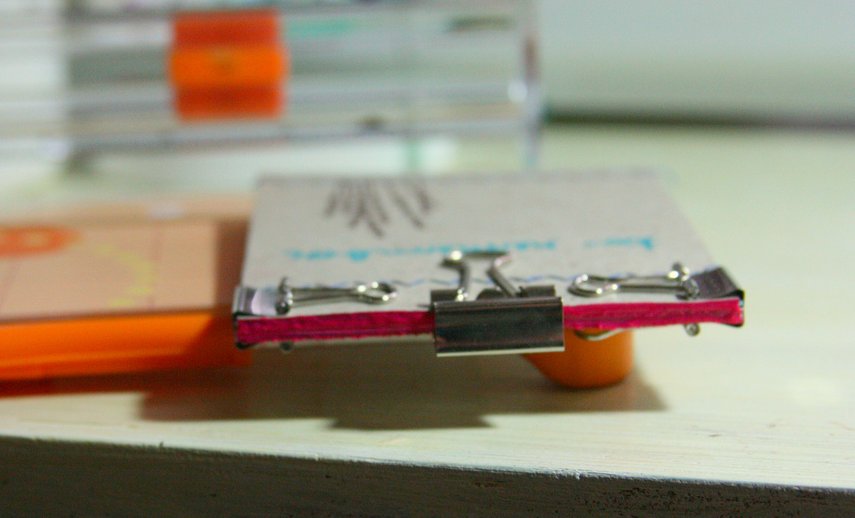
Allow this layer to dry... put something heavy on top to really press the pages together (i sometimes use another larger binder clip).


Add another layer of padding compound and allow it to dry before removing the clips.  

Step 5: Your notepad is finished! Now run off and write all your inspirations in one safe place!
I promise you'll be just as addicted as me now! Imagine the possibilities... don't make a front cover, add a magnet to the back, and you have a shopping list or meal plan for the fridge. Stamp graph paper and make a cute thank you gift for teachers or coworkers. Have a half used sketch book lying around? Why not make a notepad full of watercolor or sketch paper? I can't wait to see what you come up with!

Love this!  Be sure to leave Sarah some comment love, and head over to her blog to check out more of her projects and life!

Tuesday, March 30, 2010

Super Secret Stealthy Card Project

I absolutely love me some LollyChops (if you've been living under a rock for the past year and haven't checked out Lolly's fabulous blog yet... what are you waiting for?!) so when she was looking for help with a card project, I was happy to help!

Lolly has a friend who has recently been diagnosed with breast cancer.  She describes her friend as one of the sweetest people she knows, who is gentle and kind and always willing to lend a hand or an ear to a friend in need.

Lolly decided to do a little cards of encouragement card drive for her.  Her friend has chemo and radiation treatments scheduled over the next 7 months and Lolly is leaving her a card every few days  as she's going through it all.  Lolly and this gal work together, so she's doing a little secret santa of sorts by placing the cards on her desk each morning.

Great idea, right?  And you know I love to make cards!  Sooo... I put together a little packet of cards to mail out to Lolly for her project...


Some of these will look familiar to you... but there are a few new ones thrown into the mix as well...


Want to contribute your own card (or multiple cards!) to Lolly's project?  Drop me a note at joanneroehm@yahoo.com and I'll put you guys in touch.  Efforts like this are what the online crafting community is all about.  Cheers to Lolly for organizing this, and much love, strength, and warm wishes to her friend.

"Call it a clan, call it a network, call it a tribe, call it a family.  Whatever you call it, whoever you are, you need one."    ~Jane Howard


PS)  Stampers - don't forget that Stampin' Up!'s Sale-A-Bration promotion ends TOMORROW!  Hop over HERE to find out more and take advantage of all of our FREE products before it's too late! 


PPS)  Miss my giveaway yesterday?  You have until Wednesday to enter!  Check it out here.

Monday, March 29, 2010

Giveaway!

Let's start this week out right... want to win some free stuff?  My friends over at CSN Stores have given me some neat-o items to giveaway to one lucky reader!  CSN Stores have a HUGE selection of products... all with the convenience of online shopping!  They have everything from toddler beds, to cookware, to office supplies and more!


You know that I love me some cupcaking and cake-decorating, so for today's giveaway here's what I have up for grabs!  A Calphalon 6 Cup Jumbo Cupcake Pan, and this adorable Nordicware Platinum Butterfly Cake Pan!


Want to enter to win?  No problem!


Here are the official giveaway rules:

1.  Leave me a comment and let me know your favorite type/flavor of cupcake or cake!


2.  If you are a follower, or become a follower, let me know in your comment... for a second entry.


3.  If you are a fan on my Stampin' Up! fan page on Facebook, or become one (see the box on your right?)... get a THIRD entry.


4.  Blog about this contest on YOUR blog (linking back to this post) and win a FOURTH entry.  Be sure to leave me the link!


5.  Sorry, giveaway limited to US and Canadian residents only
 

6.  Giveaway is open until midnight EST on Wednesday March 31 and I'll announce the winner on Thursday April 1.


Good luck, friends!  Hope you win!


PS)  Stampers - don't forget that Stampin' Up!'s Sale-A-Bration promotion ends THIS WEDNESDAY!  Hop over HERE to find out more and take advantage of all of our FREE products before it's too late!


Sunday, March 28, 2010

Recap

Wow, this week flew by!  In case you missed anything...


Stop by Ready, Set, Craft! tomorrow for a fantastic giveaway you won't want to miss!

Saturday, March 27, 2010

Week In Review: March 22-25, 2010

Each weekend in my Week in Review post I share with you some of my favorite crafty links I've come across during the week, from all over the blogosphere.  Hope you enjoy... and happy weekend!

Crochet roses (and so much more!) at LollyChops
This week was Wallflowers Week over at Lolly's place and boy did she put together some beautiful 3D wall art!  These little crochet roses were my favorite though.  All I need to learn to do is crochet and I'll be good to go!

 Felt Bracelets at Crafty Chic Mommy
These would be the perfect addition to a little girls' Easter basket, don't you think?  Great stashbuster, too!

Alisa Burke's (via WhipUp) Butterfly Wreath

 This is just visually stunning!  It would be a lot of fun to work with kids on as well.  Love the bright colors!

Pysanky Eggs at Steinway Street

 These Pysanky eggs are cropping up all over the place, but this is a great, clear tutorial.  As I've mentioned before, I'd love to try this!
Did you find a project this past week that inspired you?  Leave us a link to it so that we can check it out, too!  Oh, and don't forget to head over to Babble this weekend and check out my Easter crafts!

Friday, March 26, 2010

The wait is over!

I don't have to be secretive any more!  Check out my article on Easter Crafts for Kids over at Babble.com today.  Click here.

Wednesday, March 24, 2010

Guest Post: Oversized Beach Bag

Today I'm blog swapping with a wonderfully talented blogger, and one of my personal sewing inspirations, Jane from Maiden Jane.  

Please pop over to Jane's blog to see my Flower Clip Tutorial, and keep reading for Jane's fantastic over-sized beach bag tutorial.  I can't wait to make one of these this summer for hubby and I to take to the lake on the weekends!  

Thanks for guest posting here at Ready, Set, Craft, Jane!


I'm Jane from Maiden Jane and I'm delighted to be here at Ready, Set, Craft to share a tutorial on how to make an over-sized beach bag!  I consider myself a bag lady.  If we can get it in a bag, we can sling it on our shoulder and off we go.  With four kids in tow, our many trips to the beach were an adventure.  My husband suggested I make some over-sized bags to stash blankets and beach toys.  This bag, measuring 25" wide x 28" long, is holding 8 towels!  It's showing some wear, but it is at least 10 years old.  So, if you have more than 2.4 kids or even if you want a roomy tote for your beach quilt, this is a simple and satisfying project.


Supplies:
  • 1 1/2 yard of 44" wide fabric or 3/4 yard of 54" wide fabric 
  • 2 yards of webbing for the handle
  • a cutting mat is shown here, but is not necessary for the project.  Simply use rulers or measuring tape.

Instructions:

1.  In this example, I am using a 44" wide fabric.  Because this bag is extra deep, I folded the fabric so that the selvedges lined up.  (With a 54" wide fabric, a standard fold is fine.)


2.  Cut the fabric at 27" wide.


3.  Fold fabric right sides together.


4.  Stitch along sides of bag using a 1/2" seam allowance.  On the selvedge side, the seam allowance is larger to make sure the white selvedge does not show on the right side.  No further finishing is necessary on the selvedge seam.  On the other seams, you can serge, stitch and then zig-zag or pink the edges, whichever finishing methods you prefer.


5.  Take a stitched corner and pull apart the sides so that a triangle is formed and the side seam is in the center.


6.  Even out the triangle and use a ruler to find the point where it is 9" across.  Draw a line at this point.


7.  Stitch along the line.  Cut off the triangle and finish the seam.  This creates a boxed bottom for the bag.


8.  Repeat step 6 and 7 for the other corner.  Press all seams.


9.  Fold 3" of the top edge of the bag to the inside and press.


10.  Fold the raw edge under 1/2", press and pin.


11.  Stitch the top hem close to the folded edge and go completely around the circle of the bag.


12.  Lay the bag open with seams to side.  Mark a line 8" from the seam edge on both sides.


13.  Fold the strap under 1" and place to the left side of the marked line (or to the right of the marked line on the right side).  


The fold of the strap should be two inches below the top.


Secure with pins.


14.  This part is the most difficult in the entire process.  Below you see the finished stitching from the outside of the bag.  I stitch it from the inside.   Starting with a backstitch to lock the stitches, I sew around the rectangle.  Then I stitch one diagonal line, stitch across the bottom and stitch the second diagonal line.  You can stitch it in any manner you wish.  The main idea here is to reinforce the handles.


15.  Enjoy your bag for picnics, trips to the beach, stashing sweatshirts in your car, ....