Showing posts with label Card Making. Show all posts

Monday, October 25, 2010

Quick Birthday Card & Wrapping

One of my customer's and friends, Kim, had a birthday party for her daughter Zoe this weekend.  Zoe comes to stamp a stacks with Kim and loves to stamp - so I thought it was only fitting that I sent a little hand stamped card and gift over for her.  It was a great excuse to play with a pink and girly design!


I used the Birthday Bakery stamp set, which is a level one hostess set, on pretty in pink cardstock with melon mambo ink.  I colored in the cupcake with blender pens and of course, some glitter applied with a 2-way glue pen.  To finish, I used some raven lace trim from the Holiday Mini Catalog.


I stamped an image inside the card, in the bottom right corner.  I almost never stamp images or sentiments on the inside of a card, I just leave it blank.  I think I was having too much fun and wanted the opportunity to add more glitter!


I had a lunch sack style pink paper bag that I put some little treats in and used the same lace ribbon and stamps (and yes, more glitter!) to coordinate it with the card.


It's not often I get to design a card for a child - so this was extra fun.  Come to think of it, it's not often I get to design a card that's not for a workshop, stamp a stack, or other stamping event.  This was a lot of glittery fun!  Happy Monday!

To order any of the Stampin' Up! products shown here, head to my online store and click on "Shop Now"  To find out how you can earn the Birthday Bakery hostess set for FREE, contact me about hosting a workshop at joanneroehm@yahoo.com

Monday, October 18, 2010

Flowers & Glitter

Quick post today - it's been a busy start to a busy week.  But I am feeling lots better - thanks for all the get better wishes!  I took a break from Halloween and Christmas projects to make a couple of sets of cards with the Flower Fancy stamp set.  Please excuse the kind of dark cell phone pictures! 

I'm obsessed with glitter on my projects lately, and used Dazzling Diamonds on both these card sets.  I used a two way glue pen to adhere the glitter, it's fabulous because it's permanent, goes on blue and dries clear and has a narrow marker-like tip, so you can see exactly what you're doing and place the glitter exactly where you want it.

I made one set to give as a gift...


and one set to send out to some customers...


Happy Monday!  Have a creative week!

Wednesday, October 6, 2010

Halloween Cards

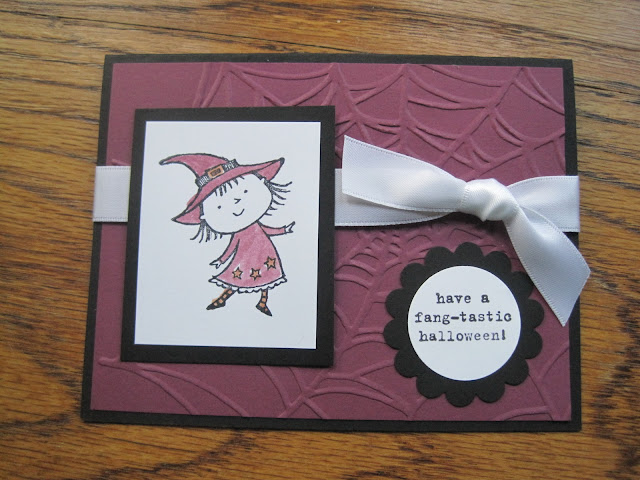
Thinking about making Halloween cards this year?  I've had a great time designing and making Halloween cards for my stamping events and to send to family and friends, and have found lots of inspiration from customers and fellow demonstrators (some of their ideas, and/or variations of them, are featured below.)  Making Halloween cards is so easy with all of Stampin' Up!'s cute supplies!  Here are some ideas, and the products I've used to make them.


Stamp Sets
Fang-tastic, Batty for You, Teeny Tiny Wishes, Seasonal Sentiments, Web Stampin' Around Wheel

Inks: 
Cajun Craze, Basic Black, Old Olive, Rich Razzleberry, Jet Black Stazon

Cardstock: 
Cajun Craze, Basic Black, Old Olive, Rich Razzleberry, Whisper White

Punches: 
1 3/8 Circle Punch, 1 3/4 Circle Punch, 1 3/4 Scallop Circle Punch, Scallop Edge

Accessories: 
Raven ribbon, White 1/4 inch grosgrain ribbon, Wicken Fun designer series paper, White satin ribbon, Stampin' Dimensionals, Snail monoadhesive

Tools: 
Big Shot Machine, Spiderweb Embossing Folder, Aqua Painters, Scallop Envelope Die 

Purchase any of these products and more 24/7 at my online store!

And for all you Michiganders - we'll be making some of these cards at my Halloween Stamp A Stack this Saturday, October 9 at 9am at my home in Grand Rapids.  I still have spots open in class so drop me a note if you'd like to join us!  Happy Halloween!

Tuesday, September 28, 2010

TGI-Tuesday?

Phew!

The weekend was such a busy one that it took all of Monday for me to regroup, reorganize, and get back on the wagon!  I spent two days over on the east side of Michigan hosting a stamp a stack for my stampers over there and doing a workshop for wonderful hostess, Sue.  There was lots of stamping and lots of socializing - but also lots of driving for me - which was the only downside to the weekend!

Here are a few picks of Sue's workshop guests working away on their make and take projects...


And of my East Side Stampers working away on their Halloween cards at the stamp a stack...


All of this stamping has got me thinking about the holidays for sure!  I'll have a few Halloween projects to share with you this week, and then I'm already thinking about Christmas!!!

(I've been stamping away making up Christmas card samples for my customers!)

How about you?  Are the holidays on your mind, or is it too early to start planning?

Thursday, September 23, 2010

Stamp Set Spotlight: Because I Care

As a Stampin' Up! demonstrator I love sharing stamping with crafters seasoned and new.  One wonderful way that I get to do this is by going out to peoples' homes and doing workshops.  I get to meet some great people and introduce them to Stampin' Up! and I always have a blast.

After each workshop, once people have received their orders, I like to send a card to each of my new customers - thanking them once again for their order and making sure they have my contact information in case they have any questions about their products, or would like more information about Stampin' Up!

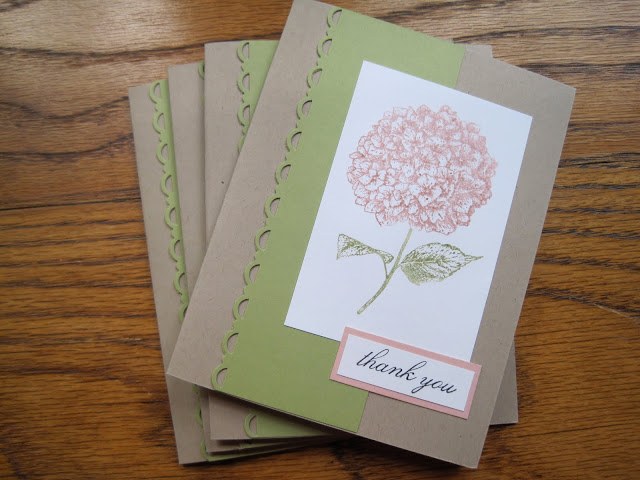
For my September workshop attendees I used the "Because I Care" level 1 hostess stamp set to make some simple cards.  I just love the big beautiful hydrangea stamp - so pretty!
 

I used Crumb Cake cardstock for the card itself, then Pear Pizzazz, Blushing Bride and Whisper White cardstock pieces for the highlights.  I used the Scallop Trim Border Punch on the piece of Pear Pizzazz cardstock, and colored the main image with Blushing Bride and Pear Pizzazz Stampin' Write markers.

You can find all of these materials (and more!) in my online Stampin' Up! store, and you can earn your own "Because I Care" stamp set by hosting a workshop of $150 or more.  If you're a Michigander, I can squeeze in just a couple of additional workshops before the holidays - if you're interested just let me know!

Happy Thursday!

Thursday, September 16, 2010

Welcome to Grand Rapids!

My husband's cousin and her husband recently moved from the east side of the state here to Grand Rapids.  We are super excited to have them so close!  We're looking forward to getting together with them to check out their new digs, and I put together a little something as a welcome gift.


They're both into breweries and local beer, and Grand Rapids has an assortment of both.  I picked up a selection of beers from local brewery Founders, and attached a little notecard.  The notecard took me all of five minutes to make...


I stamped the image I wanted ink black ink on a scrap of white cardstock, then heat-embossed it with clear embossing powder and my heat took to give it some texture.


I colored in the image using a couple of Stampin' Write Markers (in Pear Pizzazz and Peach Parfait)


I cut a piece of Peach Parfait cardstock 3 inches wide by 6 inches long and folded it in half.  I used some Whisper White satin ribbon and tied it around the card.  I then trimmed my stamped image to 2x2 inches square and attached it to the front of the card.  Done!

I hole punched the corner of the card and attached it to the beer with lots of that fun curling ribbon.  Love that stuff - very festive!


Have a great day!  And in case you missed it yesterday - be sure to check out yesterday's guest post by Arwen!

Friday, August 27, 2010

Quick Card Set

Lucky for me - I have a lot of wonderful friends, family, and customers, that I needed to thank this week!  Soooo... I put together a quick card set using (a retired pattern of) Stampin' Up!'s designer series paper...


You've seen me make these types of cards before - in fact, you can find a tutorial for the cards here (scroll down to bottom of post), and one for coordinating envelopes here.


I love these cards because they are so quick and easy to make, and really cute!  Sets of these also make a lovely gift!

Happy Friday!

Monday, August 16, 2010

Stamp Set Spotlight: Itty Bitty Bits

Welcome to this week's Stamp Set Spotlight!  Each week I highlight a different Stampin' Up! stamp set and show you some project ideas using it.  This week I'm spotlighting the Itty Bitty Bits stamp set - this set first made its appearance in the Summer Mini Catalog but carried over to the 2010-2011 Idea Book & Catalog - and I'm so glad!

Itty Bitty Bits is a great set because it comes in both clear and wood mount, and has a coordinating punch pack and set of clear buttons that go with it.  So much cuteness!

Cardstock:  Poppy Parade, Peach Parfait, Whisper White
Designer Series Paper:  None
Inks:  Poppy Parade, Peach Parfait, Pear Pizzazz, Concord Crush, Blushing Bride, Basic Black
Adhesives:  Snail Monoadhesive, Mini Glue Dots
Accessories:  Poppy Parade Stitched Ribbon, Bitty Buttons, Scallop Border Punch
Cardstock:  Whisper White
Designer Series Paper:  None
Inks:  Pear Pizzazz, Poppy Parade, Blushing Bride, Concord Crush, Peach Parfait, Basic Black
Adhesives:  Stampin' Dimensionals
Accessories:  Punch Pack
Cardstock:  Rose Red, Pretty in Pink, Certainly Celery, Bashful Blue, Whisper White
Inks:  Rose Red, Pretty in Pink, Certainly Celery, Bashful Blue
Adhesives:  Snail Monoadhesive, Stampin' Dimensionals
Accessories:  Punch Pack
Cardstock:  Whisper White
Inks:  Pacific Point
Accessories:  Basic Rhinestones

Cardstock:  Whisper White, Old Olive, Daffodil Delight, Pacific Point
Inks:  Old Olive, Daffodil Delight, Pacific Point, Soft Suede
Adhesives:  Snail Monoadhesive, Mini Glue Dots
Accessories:  Punch Pack, Bitty Buttons
To order YOUR Itty Bitty Bits stamp set and all of the bitty accessories - head over to my Stampin' Up! website today!

Friday, August 13, 2010

August Stamp A Stack Cards

I'm really excited about this month's Stamp A Stack cards... so excited in fact that some of these cards may crop up at workshops throughout the next couple of months as well.  If you're local - you should join us to make some great cards and learn some new stamping techniques.  We have a ball!

This card features the "Birthday Bakery" level 1 hostess set.  It's a simple card, but the embossing with the heat tool on the image and greeting really make it look sharp.


Here's the second card - also using Birthday Bakery.  I love the little cakes on cake stands - so cute!  We'll be using Stampin' Write markers to color in the line-art images.

The third and fourth cards we're doing at the Stamp A Stack are using the "For You Flower" a la carte stamp.  This is a great single stamp for just $7.95 that can be used throughout the year for a variety of occasions.  I'm loving it!  These cards use Poppy Parade, Concord Crush and Pear Pizzazz - three of the five 2010-2011 In Colors.  I love the red, especially.

Live in West Michigan?  I have plenty of spots available in my August 20 Stamp A Stack as several of my regular stampers are out of town this month.  First time class attendees get half off their class fee.  Join us to make 8, 12, or 15 cards - you'll have a great time!  Friday August 20, 2010 at 7:00pm at my home.  Drop me a note at joanneroehm@yahoo.com if you'd like to join us.

Not local?  Head over to my Stampin' Up! website to purchase all of the supplies needed to make these cards and more!  Happy Stamping!!!