Showing posts with label Sewing. Show all posts

Wednesday, September 15, 2010

I should've named this week "Baby Week"!! - Weg Bag Tutorial by Arwen

New Momma, and real life/blog friend Arwen (check out her blog HERE) has been making these adorable wet bags lately for baby gifts - and since baby gifts have been on my mind I thought I'd have her do a guest tutorial for us.  So without further ado, here's Arwen!

If you're like me, you know about a gazillion people who are pregnant, or who just had a baby. Having had a baby 11 months ago, I was getting a little bored with the traditional baby gifts. Inspired by using cloth diapers and some cute wetbags I saw for sale, I decided to try and make some to give as gifts.

Here is what you will need for this project: -1/2 yard of printed fabric -1/2 yard of PUL fabric -1, 14" zipper in the color of you choice -1 spool of matching thread -a walking foot for your sewing machine.

Let's get started!

First, you will need to cut your printed fabric so it is 34" long by 16 1/2" wide. Then, cut the PUL fabric so it is 36" long by 17"wide. Once you have done that, put the 2 pieces of fabric together. You want the wrong side of the printed fabric to be touching the non-shiny side of the PUL fabric. It should look something like this:

CIMG1919

Pick one side at the top, fold down the 2 layers of fabric to form a nice crease, and line your zipper up so that there is approximately 1/2" of printed fabric showing on either side. Pin one side of your zipper to this and sew straight across. I find it easier to first pin my seam, and then go through and add the zipper to the pinned seam.

 CIMG1920

CIMG1921 

Once you have sewed the first side, unzip the zipper, and repeat the same steps with the other side. After the zipper is sewed on, set the bag aside, it is time to work on the handle! For the handle, you can make it however big or small you would like. I chose these dimensions because of the print that I wanted to show, but I normally prefer to have a much smaller handle on the bag. I cut, from the printed fabric, a strip that was 19" long by 4.5" wide. Fold in half so the right sides are facing in. Pin along the outer edge and sew. Just sew the seam, do not sew the ends shut.

CIMG1924 

Once it is sewn, turn the handle right-side out. Now, take your bag and turn it inside out, so the printed fabric sides are touching, and the shiny PUL fabric is on the outside. Pull back one side of the bag, and lay the handle down so the handle is facing towards the other side of the bag and pin in place:

CIMG1925 

This may get confusing, so bear with me, I'm not an expert sewer, so I apologize. You want to sew the handle into the bag, but only sew down to the end of the handle and then stop. PUL fabric is stretchy, and when you sew the PUL fabric with the shiny sides out, it tends to bunch. This is not a problem, except if you try to sew the PUL fabric, with the printed fabric together to finish the seams and the bag, your material will also bunch. Since the PUL fabric is going to be on the inside, we need to close the printed fabric and PUL seams individually. This way, the printed fabric will not bunch, and when the PUL does, no one will be able to see it. If you're still with me, here's how I did it. Pull back your PUL fabric, to expose only the printed fabric. Do you see the red thread on the PUL where I sewed the handle? Match up that seam with where you will start and sew the printed fabric only.

CIMG1926 

Then go ahead and sew the PUL fabric on that side. Go to the other side and repeat. It should look something like this:

 CIMG1927

and here is an example of the bunching that will always happen, but no one looks inside because that's where the dirty diapers go :)

 CIMG1928

Turn the bag inside out, or right side out, et voila! You have just made a wetbag!!

CIMG1929

Monday, September 13, 2010

Baby, baby, BABY!

I'm not sure if it's something in the water, the time of year, or just the time of life most folks my age are entering into but boy are there a lot of babies on their way into the world right now!  Several of my close friends are expecting baby number 2, and many other folks I know are getting ready to welcome their first.  I think between November and April I know of almost ten impending arrivals.  So exciting and so crazy!

I realized this weekend that I needed to step up the baby gift making in order to keep up with all of these folks!  I'm working on a stock of (mostly) gender-neutral congratulations cards (some for now - congrats on being pregnant, and some for later - congrats on the birth) since most friends are not finding out the gender of their babies, and sewing up baby bibs like it's my job!


(I used Stampin' Up!'s "Baby Bundle" stamp set with Chocolate Chip cardstock and accent colored cardstock in Daffodil Delight, Pear Pizzazz, Peach Parfait, Pretty in Pink, and Bashful Blue.  I inked around the edge of my white circles in Chocolate Chip ink to add a little texture)


(Baby bibs galore!  A couple of my current faves below - I love the soft green flannel backing with the little animal images!)


I also saw this post over at UCreate, by the amazingly talented Anneliese of Aesthetic Nest.  If you haven't been over to her recently made public blog yet, you MUST!  She makes beautiful things.  Anyhoo, her guest post is a tutorial for the "Luxe Lovey" and it is so lovely.  It just so happens that JoAnn's has a big sale this weekend - and you can bet that I'll be over there stocking up on fabric to try my hand and making some of these.  What a great idea!


What are your favorite gifts to make for baby?  Or if you're a mom yourself, what do you love to receive?

Friday, July 2, 2010

Quick Slip

The couches in our living room are old.  I mean - Travis had them in his (gulp!) college house of dudes and his parents had them in their home before that, old.  They've done their time!  On the plus side, they're super comfy.  But on the other side of things - they're not looking so hot.  Have definitely seen some better days!

When we bought our home I bought some cheapo silpcovers from Bed, Bath and Beyond.  Why I bought cream I have no idea.  Not only do they look a lot like paint sheets covering the chairs - but they also pick up an insane amount of dog hair (chocolate lab, remember?!)

Anyhoo - before my sewing days Mum made us some throw pillows, and they break up the "paint sheet" look a little, but I still need to get on making some more to fill out the couch.

Since the slipcovers were cheap, awhile ago the ties fell victim to overuse and many of them ripped off.  My couches sat naked and yucky looking for months until finally, in a moment of clarity, I remembered that now that I can sew... I could fix this problem!

Mum had given me the extra fabric from the two year old pillows some time ago, so I cut, sewed and pressed some new ties, and sewed them onto the slipcovers.  Not only are the covers now functional again, but they've got just a tad more color to them!


Now... how hard do you think it would be to sew slipcovers from scratch?  In a non-cream color?  :)

Tuesday, June 29, 2010

Bandana Picnic Blanket & Weekend BBQ

Hubs and I hosted our annual summer BBQ this past weekend.  It's a lovely opportunity to get all of our friends and family together - some of whom we see all year long and some that we only see a few times a year. 

We have many friends that have young children - and I always like to try to accomodate them.  One of the things I did this year was to sew a little picnic blanket for them.  I found this great idea over at Aesthetic Nest, and featured it in one of my Week In Review posts a little while ago.  You can see Anneliese's post and directions HERE.


I made mine three by three bandanas big - and picked the bandanas up from Hobby Lobby for 99 cents a piece.  I plan on backing it later in the summer to give it a little more weight - but overall I was really pleased with how it turned out.

I had a crate of outdoor toys for the kids, and a little kid-size table and basket of coloring stuff, bubbles, and play doh.


I think they liked it...


We provided the burgers, hot dogs, ribs, condiments and buns, and everyone brought a dish to pass and some beverages to share (we provided some drinks, too)  I've found potluck style is far and away the best way to go with almost any large get together - it's less stress for me, and with very little planning there always ends up being a huge selection of food! 

I wish I had taken a picture of the food table when it was full!

I used brightly colored re-usable tablecloths, and summery colored  glasses, straws and drink stirrers.


We had a great turnout...we counted about twenty-five people in our little backyard at the height of the action.  It was a really lovely evening - I'm so glad that we do this every year!


I hope that you all have the opportunity to spend summer evenings with friends and family at gatherings big and small this summer!

Tuesday, June 8, 2010

Meg's Baby Shower

This weekend I had the pleasure and honor of helping to throw a baby shower for my dear friend Meg.  You'll remember the baby bibs I was working on last week?  I made a set of four of them as part of her gift...


As for the shower itself, I was in charge of cupcakes - of course!  12 dozen minis, in carrot, lemon, chocolate and vanilla - all topped with vanilla frosting and a fondant flower...


Here's a shot of a couple of the tables...


I picked out a variety of gerber potted daisies (Meg's favorite flower) in different shades of pink, and hand wrapped them with pink craft paper, tying them with brown satin ribbon.

For the favors, Meg's aunt had picked up some little garden-themed sticky note pads, so I made a flower pen to go with each on (45 in all!) and tied the two together with pink and brown satin ribbon, finished with a flower tag punched from cardstock.


It was a lovely shower, with many beautiful and generous gifts for Meg and baby girl.  Here's a shot of me with my Mum and Meg - the mom to be!


And one of Meg and I...


Thanks so much to Meg and her wonderful family for allowing me to help make Meg's shower extra special!

Thursday, June 3, 2010

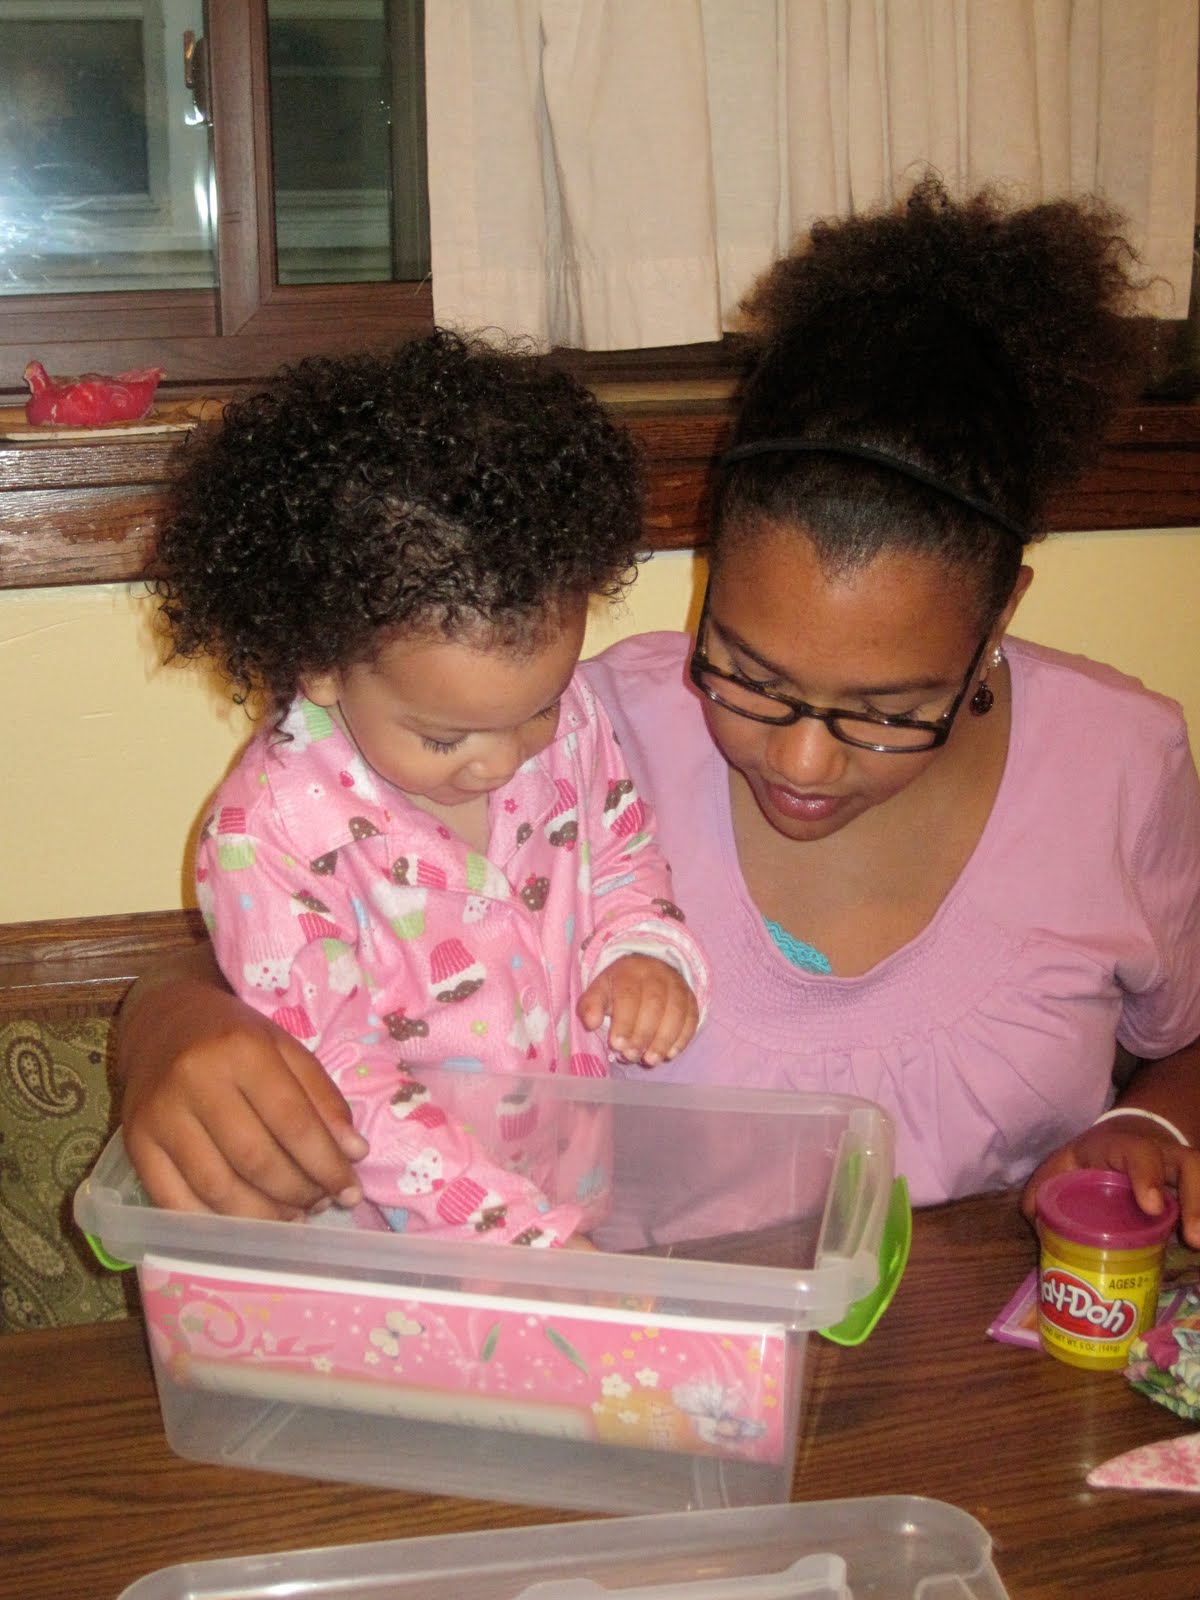
Lily's Get Better Box

I finished up Lily's Get Better Box late Tuesday evening in time for her to have it before going in for surgery early Wednesday morning.  Excuse the poor quality photos (it was dark out!) but take a peek at the finished box and its contents!


As you can see, I used a rubbermaid-style tote with colored handles for the box.  It's shoebox size.  For the label, I used Stampin' Up! cardstock in Whisper White, Lovely Lilac, and Green Galore and but and embossed the butterflies using my Big Shot Die Cut Machine (also from SU).  The lettering was printed onto the cardstock.  You can't tell in this photo, but I used Stampin' Dimensionals for some of the bigger butterflies so that they popped off the box a little to give a 3D effect.


My older niece, Mariah, was on hand to help Lily open her box.  Of course Lily had no idea what was going on and why she was getting presents, especially so early in the morning.  But she was rocking out her cupcake PJ's and having a ball all the same!

You met the pink bunny a couple of days ago... she was a hit...


And you'll remember the ribbon-trimmed bandanas, too.  Four in all...


There was also a storybook, some playdough, a coloring book and crayons, and a sticker book and stickers...


And finally, a comfy pair of PJ pants for when she comes home...


I hope that this little box of fun will help Lily have a speedy recovery, and can be used and refilled for years to come bringing just a little smile when she's feeling under the weather.


Feel better soon, Lily!