I guess this is actually part two - since I already shared our pumpkin carving with you! I hope that you had a wonderful Halloween weekend! We had a fabulous weekend - carving pumpkins, a birthday party, Trick or Treating and more. Lots and lots of beautiful memories made!
For the little ones in my life - I put together some Halloween gift bags with tags. I had the best intentions for the longest time to SEW the bags themselves out of felt - I have all the supplies and everything - but time got away with me and lots of exciting changes have been happening in my life this past week (more on that to come later this week...) and I just ran out of time.
I used the Fang-Tastic stamp set from the Holiday Mini Catalog. I love this set and have used it more than anything else in the mini catalog thus far. This set will only be available until December 31. Visit my online store today if you'd like to pick up this set for yourself - it's so cute!
The vampires were the boys' bags and the witches indicated the girls' bags...
I inked the edges of the white cardstock using a Pumpkin Pie ink pad for an extra spooky effect...
I have a thing for curling ribbon. Putting these together got me excited about Christmas wrapping. I LOVE to wrap Christmas gifts!
I thought they turned out really cute - and the kids certainly enjoyed them! I filled them with sweet treats (of course!), plus a Halloween book, some play doh, and more.
More Halloween recaps and Trick or Treating photos tomorrow! Happy Monday!
Showing posts with label Gifts. Show all posts
Monday, November 1, 2010
Thursday, September 16, 2010
Welcome to Grand Rapids!
My husband's cousin and her husband recently moved from the east side of the state here to Grand Rapids. We are super excited to have them so close! We're looking forward to getting together with them to check out their new digs, and I put together a little something as a welcome gift.
They're both into breweries and local beer, and Grand Rapids has an assortment of both. I picked up a selection of beers from local brewery Founders, and attached a little notecard. The notecard took me all of five minutes to make...
I stamped the image I wanted ink black ink on a scrap of white cardstock, then heat-embossed it with clear embossing powder and my heat took to give it some texture.
I colored in the image using a couple of Stampin' Write Markers (in Pear Pizzazz and Peach Parfait)
I cut a piece of Peach Parfait cardstock 3 inches wide by 6 inches long and folded it in half. I used some Whisper White satin ribbon and tied it around the card. I then trimmed my stamped image to 2x2 inches square and attached it to the front of the card. Done!
I hole punched the corner of the card and attached it to the beer with lots of that fun curling ribbon. Love that stuff - very festive!
Have a great day! And in case you missed it yesterday - be sure to check out yesterday's guest post by Arwen!
They're both into breweries and local beer, and Grand Rapids has an assortment of both. I picked up a selection of beers from local brewery Founders, and attached a little notecard. The notecard took me all of five minutes to make...
I stamped the image I wanted ink black ink on a scrap of white cardstock, then heat-embossed it with clear embossing powder and my heat took to give it some texture.
I colored in the image using a couple of Stampin' Write Markers (in Pear Pizzazz and Peach Parfait)
I cut a piece of Peach Parfait cardstock 3 inches wide by 6 inches long and folded it in half. I used some Whisper White satin ribbon and tied it around the card. I then trimmed my stamped image to 2x2 inches square and attached it to the front of the card. Done!
I hole punched the corner of the card and attached it to the beer with lots of that fun curling ribbon. Love that stuff - very festive!
Have a great day! And in case you missed it yesterday - be sure to check out yesterday's guest post by Arwen!
Wednesday, September 15, 2010
I should've named this week "Baby Week"!! - Weg Bag Tutorial by Arwen
New Momma, and real life/blog friend Arwen (check out her blog HERE) has been making these adorable wet bags lately for baby gifts - and since baby gifts have been on my mind I thought I'd have her do a guest tutorial for us. So without further ado, here's Arwen!
If you're like me, you know about a gazillion people who are pregnant, or who just had a baby. Having had a baby 11 months ago, I was getting a little bored with the traditional baby gifts. Inspired by using cloth diapers and some cute wetbags I saw for sale, I decided to try and make some to give as gifts.
Here is what you will need for this project: -1/2 yard of printed fabric -1/2 yard of PUL fabric -1, 14" zipper in the color of you choice -1 spool of matching thread -a walking foot for your sewing machine.
Let's get started!
First, you will need to cut your printed fabric so it is 34" long by 16 1/2" wide. Then, cut the PUL fabric so it is 36" long by 17"wide. Once you have done that, put the 2 pieces of fabric together. You want the wrong side of the printed fabric to be touching the non-shiny side of the PUL fabric. It should look something like this:
Pick one side at the top, fold down the 2 layers of fabric to form a nice crease, and line your zipper up so that there is approximately 1/2" of printed fabric showing on either side. Pin one side of your zipper to this and sew straight across. I find it easier to first pin my seam, and then go through and add the zipper to the pinned seam.
Once you have sewed the first side, unzip the zipper, and repeat the same steps with the other side. After the zipper is sewed on, set the bag aside, it is time to work on the handle! For the handle, you can make it however big or small you would like. I chose these dimensions because of the print that I wanted to show, but I normally prefer to have a much smaller handle on the bag. I cut, from the printed fabric, a strip that was 19" long by 4.5" wide. Fold in half so the right sides are facing in. Pin along the outer edge and sew. Just sew the seam, do not sew the ends shut.
Once it is sewn, turn the handle right-side out. Now, take your bag and turn it inside out, so the printed fabric sides are touching, and the shiny PUL fabric is on the outside. Pull back one side of the bag, and lay the handle down so the handle is facing towards the other side of the bag and pin in place:
This may get confusing, so bear with me, I'm not an expert sewer, so I apologize. You want to sew the handle into the bag, but only sew down to the end of the handle and then stop. PUL fabric is stretchy, and when you sew the PUL fabric with the shiny sides out, it tends to bunch. This is not a problem, except if you try to sew the PUL fabric, with the printed fabric together to finish the seams and the bag, your material will also bunch. Since the PUL fabric is going to be on the inside, we need to close the printed fabric and PUL seams individually. This way, the printed fabric will not bunch, and when the PUL does, no one will be able to see it. If you're still with me, here's how I did it. Pull back your PUL fabric, to expose only the printed fabric. Do you see the red thread on the PUL where I sewed the handle? Match up that seam with where you will start and sew the printed fabric only.
Then go ahead and sew the PUL fabric on that side. Go to the other side and repeat. It should look something like this:
and here is an example of the bunching that will always happen, but no one looks inside because that's where the dirty diapers go :)
Turn the bag inside out, or right side out, et voila! You have just made a wetbag!!
Monday, September 13, 2010
Baby, baby, BABY!
I'm not sure if it's something in the water, the time of year, or just the time of life most folks my age are entering into but boy are there a lot of babies on their way into the world right now! Several of my close friends are expecting baby number 2, and many other folks I know are getting ready to welcome their first. I think between November and April I know of almost ten impending arrivals. So exciting and so crazy!
I realized this weekend that I needed to step up the baby gift making in order to keep up with all of these folks! I'm working on a stock of (mostly) gender-neutral congratulations cards (some for now - congrats on being pregnant, and some for later - congrats on the birth) since most friends are not finding out the gender of their babies, and sewing up baby bibs like it's my job!
(I used Stampin' Up!'s "Baby Bundle" stamp set with Chocolate Chip cardstock and accent colored cardstock in Daffodil Delight, Pear Pizzazz, Peach Parfait, Pretty in Pink, and Bashful Blue. I inked around the edge of my white circles in Chocolate Chip ink to add a little texture)
(Baby bibs galore! A couple of my current faves below - I love the soft green flannel backing with the little animal images!)
I also saw this post over at UCreate, by the amazingly talented Anneliese of Aesthetic Nest. If you haven't been over to her recently made public blog yet, you MUST! She makes beautiful things. Anyhoo, her guest post is a tutorial for the "Luxe Lovey" and it is so lovely. It just so happens that JoAnn's has a big sale this weekend - and you can bet that I'll be over there stocking up on fabric to try my hand and making some of these. What a great idea!
What are your favorite gifts to make for baby? Or if you're a mom yourself, what do you love to receive?
I realized this weekend that I needed to step up the baby gift making in order to keep up with all of these folks! I'm working on a stock of (mostly) gender-neutral congratulations cards (some for now - congrats on being pregnant, and some for later - congrats on the birth) since most friends are not finding out the gender of their babies, and sewing up baby bibs like it's my job!
(I used Stampin' Up!'s "Baby Bundle" stamp set with Chocolate Chip cardstock and accent colored cardstock in Daffodil Delight, Pear Pizzazz, Peach Parfait, Pretty in Pink, and Bashful Blue. I inked around the edge of my white circles in Chocolate Chip ink to add a little texture)
(Baby bibs galore! A couple of my current faves below - I love the soft green flannel backing with the little animal images!)
I also saw this post over at UCreate, by the amazingly talented Anneliese of Aesthetic Nest. If you haven't been over to her recently made public blog yet, you MUST! She makes beautiful things. Anyhoo, her guest post is a tutorial for the "Luxe Lovey" and it is so lovely. It just so happens that JoAnn's has a big sale this weekend - and you can bet that I'll be over there stocking up on fabric to try my hand and making some of these. What a great idea!
What are your favorite gifts to make for baby? Or if you're a mom yourself, what do you love to receive?
Wednesday, June 23, 2010
Presents!
You may remember that she won my blogiversary giveaway back in January? Well she put together a little thank you gift using her "winnings" - isn't that sweet?
I love the butterflies stamped on the brown wrapping paper. So pretty.
She made me a birthday book - and it's so completely clever and unique!
Inside there are tabs and pages for all of my friends and family - each person gets a page. As I think about birthday gift or project ideas for a specific person, I write them down on their page. So clever!
There's even a little pocket in which to keep receipts!
Thank you so much, Abs! What a darling gift and so creative! I love it!
Now, my other gift may make me a bit of a dork. But I have seriously wanted one of these for FOREVER...
Yup, I'm awesome. Stop laughing and hear me out!!!
I am the slowest coffee drinker of all time - seriously. I am constantly having to suffer through lukewarm coffee or run downstairs to reheat - to only forget about it in the microwave. It's such a pain! I've been casually dropping hints to my family and friends about how much better life would be with a mug warmer for some time now - and hubs finally caved in and made it happen!
As I sit here typing my mug warmer is next to me with a perfectly warm cup of coffee sitting atop it. I'm one happy girl.
Have you given/received any sweet gifts lately?
Wednesday, June 16, 2010
Father's Day Gifts for Kids
Won't you hop on over to Babble and check out my latest kids craft article?
And don't forget to find me on Twitter if you haven't already!
Say "Hi" at Twitter.com/readysetcraft
Happy Wednesday!
Tuesday, June 8, 2010
Meg's Baby Shower
This weekend I had the pleasure and honor of helping to throw a baby shower for my dear friend Meg. You'll remember the baby bibs I was working on last week? I made a set of four of them as part of her gift...
As for the shower itself, I was in charge of cupcakes - of course! 12 dozen minis, in carrot, lemon, chocolate and vanilla - all topped with vanilla frosting and a fondant flower...
Here's a shot of a couple of the tables...
I picked out a variety of gerber potted daisies (Meg's favorite flower) in different shades of pink, and hand wrapped them with pink craft paper, tying them with brown satin ribbon.
For the favors, Meg's aunt had picked up some little garden-themed sticky note pads, so I made a flower pen to go with each on (45 in all!) and tied the two together with pink and brown satin ribbon, finished with a flower tag punched from cardstock.
It was a lovely shower, with many beautiful and generous gifts for Meg and baby girl. Here's a shot of me with my Mum and Meg - the mom to be!
And one of Meg and I...
Thanks so much to Meg and her wonderful family for allowing me to help make Meg's shower extra special!
As for the shower itself, I was in charge of cupcakes - of course! 12 dozen minis, in carrot, lemon, chocolate and vanilla - all topped with vanilla frosting and a fondant flower...
Here's a shot of a couple of the tables...
I picked out a variety of gerber potted daisies (Meg's favorite flower) in different shades of pink, and hand wrapped them with pink craft paper, tying them with brown satin ribbon.
For the favors, Meg's aunt had picked up some little garden-themed sticky note pads, so I made a flower pen to go with each on (45 in all!) and tied the two together with pink and brown satin ribbon, finished with a flower tag punched from cardstock.
It was a lovely shower, with many beautiful and generous gifts for Meg and baby girl. Here's a shot of me with my Mum and Meg - the mom to be!
And one of Meg and I...
Thanks so much to Meg and her wonderful family for allowing me to help make Meg's shower extra special!
Thursday, June 3, 2010
Lily's Get Better Box
I finished up Lily's Get Better Box late Tuesday evening in time for her to have it before going in for surgery early Wednesday morning. Excuse the poor quality photos (it was dark out!) but take a peek at the finished box and its contents!
As you can see, I used a rubbermaid-style tote with colored handles for the box. It's shoebox size. For the label, I used Stampin' Up! cardstock in Whisper White, Lovely Lilac, and Green Galore and but and embossed the butterflies using my Big Shot Die Cut Machine (also from SU). The lettering was printed onto the cardstock. You can't tell in this photo, but I used Stampin' Dimensionals for some of the bigger butterflies so that they popped off the box a little to give a 3D effect.
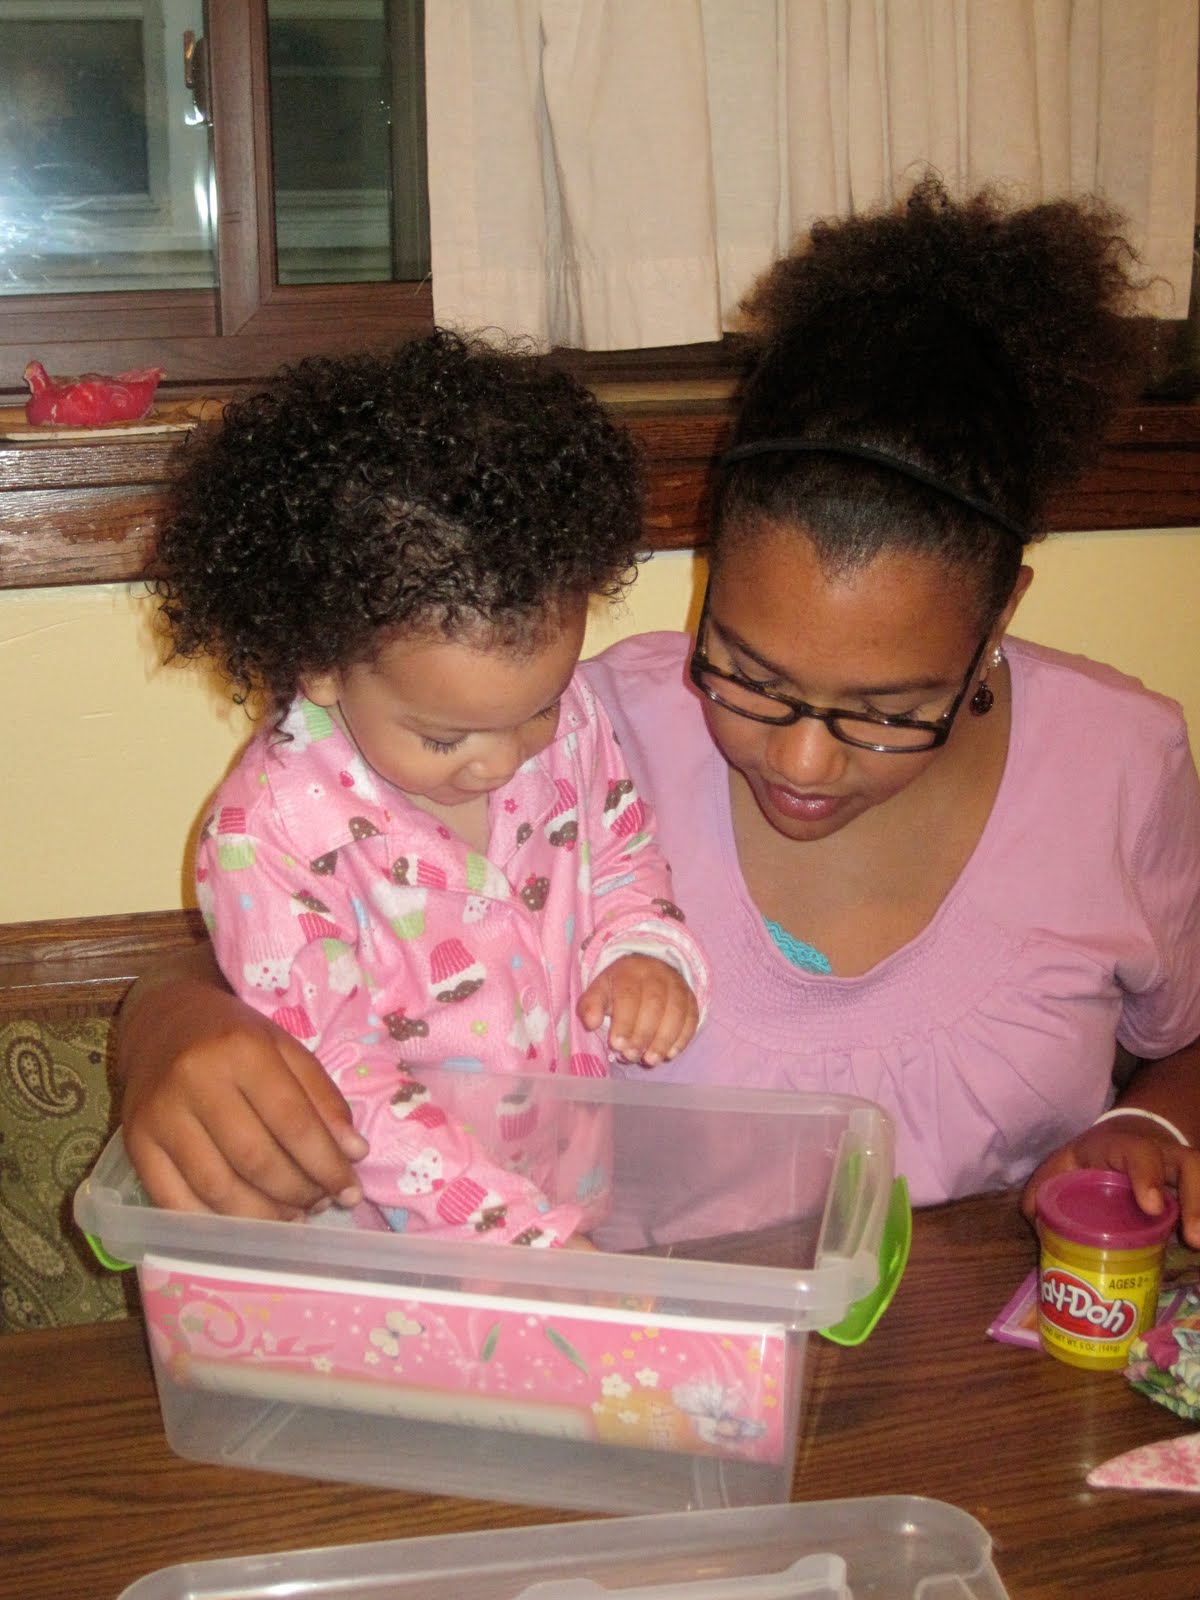
My older niece, Mariah, was on hand to help Lily open her box. Of course Lily had no idea what was going on and why she was getting presents, especially so early in the morning. But she was rocking out her cupcake PJ's and having a ball all the same!
You met the pink bunny a couple of days ago... she was a hit...
And you'll remember the ribbon-trimmed bandanas, too. Four in all...
There was also a storybook, some playdough, a coloring book and crayons, and a sticker book and stickers...
And finally, a comfy pair of PJ pants for when she comes home...
I hope that this little box of fun will help Lily have a speedy recovery, and can be used and refilled for years to come bringing just a little smile when she's feeling under the weather.
Feel better soon, Lily!
As you can see, I used a rubbermaid-style tote with colored handles for the box. It's shoebox size. For the label, I used Stampin' Up! cardstock in Whisper White, Lovely Lilac, and Green Galore and but and embossed the butterflies using my Big Shot Die Cut Machine (also from SU). The lettering was printed onto the cardstock. You can't tell in this photo, but I used Stampin' Dimensionals for some of the bigger butterflies so that they popped off the box a little to give a 3D effect.
My older niece, Mariah, was on hand to help Lily open her box. Of course Lily had no idea what was going on and why she was getting presents, especially so early in the morning. But she was rocking out her cupcake PJ's and having a ball all the same!
You met the pink bunny a couple of days ago... she was a hit...
And you'll remember the ribbon-trimmed bandanas, too. Four in all...
There was also a storybook, some playdough, a coloring book and crayons, and a sticker book and stickers...
And finally, a comfy pair of PJ pants for when she comes home...
I hope that this little box of fun will help Lily have a speedy recovery, and can be used and refilled for years to come bringing just a little smile when she's feeling under the weather.
Feel better soon, Lily!
Subscribe to:
Posts (Atom)